 |
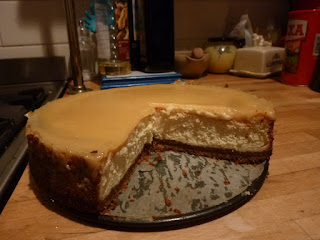
| cheesecake just out the oven & jar of lemon curd (the strange green dot is on my camera lens not the cake - honest!) |
 |
| I forgot to take a photo before I sliced into it, that was how keen I was to try it! |
Lemon and Ginger Cheesecake (serves 12) [my helpings must be stingy but I still managed to get 12 out the 20cm cake tin!]
120g unsalted butter, melted, plus extra for greasing
200g ginger nut biscuits
90/100g caster sugar
20g cornflour
720g full fat cream cheese at room temperature
90/100g beaten egg (this was 2 medium eggs)
90/100ml thickened cream (I used double cream for this and whipped it up with a hand whisk)
(just under) 1tsp vanilla extract
zest of 2 lemons
Preheat the oven to 180 degrees C. Line and grease a 20cm loose bottom, spring form cake tin. Put the ginger biscuits in a food processor and blend until fine then add the melted butter and stir together. Press the biscuit mixture into the bottom of the tin, making sure you cover the bottom evenly and it is compacted well [I use a wooden spoon to pat the top down and ensure an even spread over the tin]. Bake in the preheated oven for ten minutes and allow to cool while you make the filling for the cheesecake. Increase oven to 200 degrees C.
Put the sugar and cornflour in food processor [the recipe says a stand mixer with a balloon whisk but I have a glass food processor with a balloon whisk button - worked just as well]. Add the cream cheese and blend until smooth and creamy and well combined. Continue to mix and add the beaten egg gradually until well combined. Add the cream, vanilla extract and lemon zest (the recipe says to add them gradually but I just stuck them all in together and it worked fine). I then whisked it all again a bit just to make sure it was all blended together.
Scrape the cream cheese mixture onto the cooled biscuit base, and tap the tin to try and level out the top. Bake in the preheated oven for 40-45 minutes until the top is golden brown and the filling is set. [I found the temperatures and times given on this recipe pretty much perfect - which is a first as my cooker always seems to cook things faster than the recipe says]. Now I didn't read the next bit of Nic's recipe properly so if you're making this then please do follow her advice here: I had to rotate mine halfway through cooking to ensure even browning. It wasn't a major problem but mine was definitely a bit browner on one side than the other so I could have done with rotating it.
The next bit of her recipe is to make your lime curd - or, like me, get someone else to make it for you! However knowing how good the home made stuff tastes I think I'll be trying Nic's lime curd recipe at some point soon! Seriously, I don't know why I've never discovered the joys of lemon curd before now. It wasn't really something we ever had as children and it just never really appealed to me. However I had to stop myself from eating the rest of the jar as I was heating it up as it is so delicious!
I let the cake cool for quite a while before I added the lemon curd and I followed her suggestion to heat the curd in a pan first. Apparently this means that as it cools down it forms a shiny later on top of the cheesecake. I put mine in the fridge after I'd poured the curd on top and it did indeed form a nice shiny topping.
This cake was so tasty! It was my first attempt at a baked cheesecake and I can't believe how straight-forward it was. I don't know why but I thought it would be a lot harder. Maybe this is down to the good recipe and instructions given, also I'm sure down to the incredibly tasty lemon curd I was lucky enough to have!
