Monday 30 January 2017

2016 - my year in sewing

A bit late I know but I wanted to get this post in before the end of January. More than ever now sewing is a form of therapy, relaxation and escape - I plan to get more actively involved in politics and protest this year but I also crave and highly value my sewing time as time to get away from it all and create!
So this is a quick summary of what I made last year, with some photos, and I'm sure some omissions.  I was really surprised by how many garments I made in 2016, in addition to quilts and other presents.  There are some blogs I follow where people sew 12 garments in a month or two but for me 12 in a year is quite a lot, especially now that quilting is taking up more and more of my spare time.  Given that I wear and love them all I'm very happy with how much I made in 2016.
clockwise from top left: Purple Brumby, Pink wool A-line skirt from Sewing Bee Fashion with Fabric book, Blue & beige Brumby skirt, Pink Brumby skirt

Clothes for me:
Pink wool skirt
Pink raglan sweater
Geometric raglan sweater
Green plantain dress
Pink Brumby skirt
Inari tee dress
Bright pink Burda Pleated Shorts 02/2013 #129
Pale pink Burda Pleated Shorts 02/2013 #129
Purple Brumby skirt
Pale blue & beige striped Brumby skirt
Marilla Walker Maya top - unblogged but you can see it here. I really should blog this as I love it!

Clockwise from top left: Bright pink Burda shorts, pale pink Burda shorts, Pink raglan sweater, Geometric raglan sweater
So for me 4x skirts, 2x shorts, 2x sweater, 2x dress, 1x top, 1x cardigan -  12 garments made using 8 patterns


From left to right: Inari dress; Jalie drop pocket cardigan, worn with Marilla Walker Maya top & purple Brumby; Green plantain tee dress
Clothes for others:
African wax fabric shorts from Fashion with Fabric Great British Sewing Bee book for Oliver (never blogged - my first time doing a zip fly front, which worked well. Unfortunately they were too big)
Purl Soho baby pants (gift)
2 x pattern no.10 from Ottobre magazine 1/2013 - navy/white striped & pink with blue/white stripes (pink one didn't work, neckline too big - need to alter)
2x skinny flashback tee
Geometric raglan sweater
Gifts:
Book bags 3 unblogged & 4 blogged (well they will be by the time I post this)
3 x Totoro soft toys
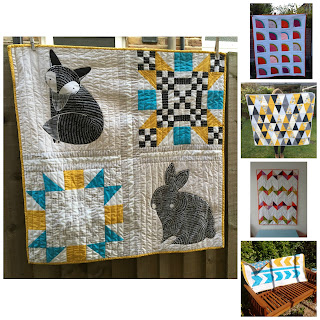
Quilts: 5 baby quilts of varying sizes


Two of my Totoro's.
Quilts


So the key question, how successful have my makes been?! Well none of the items I've made for me have been duds and I wear them all. The majority of what I made is more Spring/summer wear but the pink wool skirt gets a LOT of wear at the moment. I lined it so it's nice and warm for this cold weather. Likewise both my raglan sweaters have been getting a lot of wear in the colder weather.  I wore my Inari dress on New years eve with tights but generally prefer it in warmer weather without tights as it's quite thin so not the warmest dress.  The shorts for my husband were a dud, as was one of the t-shirts I made for my son.  Both of these are fixable though, if I ever get round to it!


Looking at all these makes I can't wait to get into some warmer weather again and start wearing my Brumby skirts, and make some more!  I really enjoyed reading everyone's round-ups from last year, hopefully this isn't too late to be of enjoyment to others.

Saturday 7 January 2017

Christmas gift making


I didn't initially plan on making so many Christmas presents but once I got started I really got into them and wanted to make more.  After talking to a friend recently I realised that making bags was one of the things my mum did when we were small, and in fact before we were born, I think it's one of the things she made and sold after art school.  Her early ones were beautiful patchwork leather and suede. I'll need to dig some out to share with you all.  Later she made ones from fabric she dyed or tie-dyed herself.  The apple never falls far from the tree as the old saying goes.

I started off with the Kids Wash bag tutorial from Handmade Jane - I've made this a few times already but don't even know if I kept photos of the earlier ones before I sent them off.  In fact I forgot to take a photo of one of the Christmas ones before I sent it off.  It was a lovely owl fabric remnant I bought in a fabric shop in Abergavenny years ago with the mother of the recipient in mind as she loves owls.  So I made the owl bag and this cute mushroom one from fabric I've had for years (I think a remnant from Ray Stitch). 


The mushroom one was to hold a book for a 7 month old and I was about to make a similar drawstring bag for his big sister (aged 4) when I remembered how much Harris loves having bags he can carry around, put cars and people in, take them out, organise them etc.  So I thought she might prefer one with handles too.  I still had some of the elephant fabric I used to make her baby blanket 4 years ago so I decided to use this, and while I was at it why not throw in some new quilting experience too! I followed the Reverse Sawtooth Star tutorial from Suzy Quilts (I'm not in any way affiliated by the way, I just love her patterns and tutorials!) and then just improvised a bag from there.  These bags are made in the same way as the drawstring bags, with lining and french seams. The orange fabric on the straps is the same fabric I used to line it.


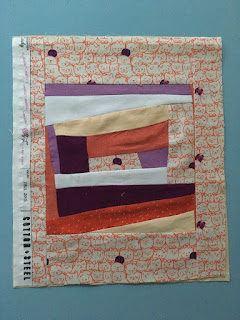
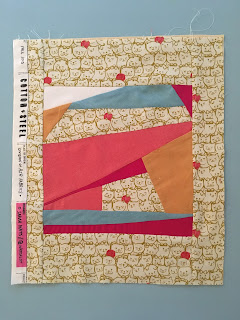
I enjoyed using a quilting panel as the centre of the bag so much that I decided to do it again. This one was for an almost one year old, another book bag which I hope she'll enjoy using to carry things about in as she gets a bit bigger. Once again I used the same base fabric as I used in her baby quilt but this time decided I wanted to try some improv quilting.  I used this tutorial from Mama Loves Quilts as the basis but kind of winged it really once I got into it.  All the other fabrics were from my stash.


On the reverse side I decided to really go for it and just be a bit more free with the design. I loved it, I'm usually quite rigid about sticking to patterns, following recipes etc and I think I need to do more improvised and free work as it is so much fun! I think I like this side even more than the first.


The cat fabric is by Cotton and Steel and it had such a nice selvedge I decided to leave it in as part of the design.  I felt the straps on my last bag were too thin and didn't like how you could see the reverse of the fabric so this time I cut 4 straps and sewed them together reverse sides, leaving a small gap to poke it through, then hand-stitched up the gap.  I reinforced the straps where I attached them to the bag in both bags.  Finished bag photos below, with the beautiful book it was to hold.


And last but by no means least is the bag I made for my nephew! I really could have kept this one for myself too as I loved it so much! The fabric is from the Small World range by Rae Hoekstra and all her fabric designs are just so gorgeous.  This was just a simple tote bag made with french seams and lining. I think I used a yellow for the lining but I can't remember for sure.  I thought this fabric was so amazing it didn't need anything else, just a simple design.  And that's a wrap (crying-worthy pun sorry!)


Friday 6 January 2017

Little Critters quilt

When I saw the Little Critters fabric by Moda I just had to buy some and make a quilt with them as the animals were too cute to resist.  I bought two panels so I could get all 4 animals.  This post is quite picture heavy - I hope you enjoy them as much as me!


Design: I already had a recipient in mind, a friend who was expecting, and my original plan was just to make a quick quilt with all four animals and a border in the middle.  However once I started thinking about it I wanted to challenge myself a bit more so I decided to only use two animals and make two design panels to go with them.  My friend Shivani had kindly lent me two quilting books when I started quilting and I found a lovely design in one of them - 'Quilting Happiness' by Christina Lane & Diane Gilleland.
Drawing of the various bits that make up the finished block.
The quilt the block came from is called the 'Odds and Ends quilt' and it was pretty involved to make up, lots of different little shapes but oh so satisfying when it started to come together!  I was only making two blocks but I can imagine a full quilt using this block would take ages! After doing the panels I realised I wanted a bit more design in the connecting borders so I used two strips of white on the outer with the patterned fabric in the middle.
making one of the squares which make up the block
Watching it come together was so satisfying!
Fabric used: The blue and yellow fabric were both from my stash, as was the back of the quilt.  The back is a fish print by Charley Harper from the Maritime Collection which I bought from Billow Fabrics as an impulse buy when using some Charley Harper Flamingo knit (which is as amazing as it sounds!) It is a beautiful print and colour and I felt it was perfect for this couple as they both love the sea, she grew up by the sea and I know he likes fishing.

Back of the quilt

Close-up of back of quilt
Quilting: You might notice an improvement on the quilting in this quilt?! Do you?! I certainly do.  This is the result of a Christmas present Walking Foot from my Dad & step-mum.  Oh my goodness I love it so much! It has made such a difference to my enjoyment of the actual quilting. No more worrying about puckers and gathers, just nice even quilting.  I used straight lines for this, 1" apart but I didn't quilt over the animals. Instead I used my new walking foot and quilted round the shape of each animal which wasn't nearly as hard as I thought it would be.
Reflections: This quilt was really good fun to make and I absolutely love how it turned out.  When I looked back at 'Quilting Happiness' I noticed that it classed this block as for 'experienced quilters' which made me feel very pleased to have tried it.  I think the overall effect of this quilt is really striking and it feels so good to have designed it myself in a way, by combining ideas from different quilt patterns.  I would like to make a quilt for myself but I don't know if I'd get as much enjoyment from it as I do from gifting them.  Though I have started working on one for Harris which I'll do bit by bit.
All ready to be packed up and sent to its new home.

Thursday 5 January 2017

Watermelon quilt


I thought that I would start the year by blogging about the last few of my makes of 2016.  This quilt was even longer in the making than it was in the blogging! It was worth it though I'd say as I love how it turned out and had so much fun choosing the fabrics and making it.  It's the Mod Melon's quilt from Suzy Quilts, a free pattern which, like every other pattern or tutorial I've used by Suzy Quilts, is brilliant!  It was the colours that drew me in first, all those pinks.  I immediately thought of a friend who I know likes watermelons so when I found out she was pregnant I knew just what to make.

Finished quilt front
It took me a while to choose all the colours but as I like pinks so much anyway I had plenty to choose from! All the fabrics came from my stash except the white which was a sheet I bought from a local charity shop.  The cutting took a long time too as there were three different curved shapes as well as the main watermelon piece. Then I still had to decide on the order of the watermelons, I laid them out a few different combinations before I decided.

My first three attempts at sewing curves. Thankfully they improved after this!
Planning the order of the watermelons
This was my first time sewing curves and my first three attempts were pretty terrible, they were all warped and ended up too small.  Once I watched the video on the Suzy Quilts Mod Melon page as well as a few other videos on YouTube it made more sense and I tackled it again, with much more success. I didn't use any pins when sewing up the curves which was quite liberating (if that makes sense?!).  Like anything else the more I did the faster I got at sewing them.  If you look at the pattern and then at my version you might notice mine is a bit smaller. That's because I wanted to do a baby sized version.  So I sized down a bit. I thought I'd worked out what size it would be but by the time I added borders it ended up bigger than I planned.  The quilting itself wasn't too hard but there are a lot of puckers and drag lines as I didn't have my walking foot and the fabric was definitely pulling under the needle and ending up all gathered at the end of the line.  When I was struggling with deciding on how to quilt it, that is what pattern to use, I posted on the quilt forum on pattern review and got some really helpful replies, including some suggestions of doing a combinations of straight lines and curves, which is what I went with.  I had some nice purple flannel I'd bought ages ago from M is for Make that made a lovely soft backing and the solid colour works well with the busy pattern on the front.

Close-up of all the lovely fabrics
Quilt back, bound & quilted.

I am so pleased with how this quilt turned out and very happy that I tried out curves even though I was a bit apprehensive about it.  The colours of it are brilliant and.. it's watermelons so what's not to love!! This has been gifted now and I know it's being loved in its new home which is great.  I get so much joy and satisfaction out of planning and making quilts and in a way I think I'm finding this more therapeutic than garment sewing.  Not that I'm giving up garment sewing any time soon but I do have one more quilt to share with you before I return to clothes!


Tuesday 3 January 2017

A new make and an oldie

Happy New Year everyone!  I thought I would start the New Year by blogging about my last un-blogged garment I made in 2016 and the first thing I've made in 2017.  I apologise in advance for the very crap photos of the cardigan but I just wanted to get this posted and get on with some new makes!


So, out with the old first (see what I mean about the terrible photos, sorry!)  Well actually this is the new in that this was a new to me pattern but this cardigan was a loong time in the making. I think I started it in 2015 and finally got it finished on a weekend trip to Glasgow in September 2016.  I went up for a weekend to visit friends and managed to fit in a sewing afternoon with some Scottish bloggers at the Stitchery Studio.  It was such a lovely afternoon, I hope I get a chance to do it again soon! I couldn't decide what to take to sew so I took a few options and on the day this was the one I decided I wanted to do in order to finally get it finished.  

Details - 
Pattern: Jalie 3248 Drop Pocket cardigan.  I was after a pattern for a cardigan, mostly for work wear, that had pockets.  After seeing a few versions of this Jalie pattern that I liked, particularly Nancy's version as well as reading reviews on Pattern Review, I decided to go with it even though the cover art work isn't particularly inspiring!
 

Size: I cut a straight size T. I've included the size chart below so you can see what a wide size range these patterns cover.

Fabric & notions: £10 for pattern including delivery (from Habithat), £10 for metre of brown John Kaldor jersey from Mandors (still have enough left for a t-shirt), approx £10 for 2 metres of navy blue jersey (still enough left for a t-shirt) from the Man outside Sainsbury's.  I had to buy the brown/brick coloured thread, say £3? They're both quite thin so this got a lot more wear in Autumn than now as we're having a colder winter than usual for London.
Were the instructions clear?: This was my first time using a Jalie pattern and although the instructions aren't visually as appealing as some of the other indie patterns they are really good.  On reading through them they don't make much sense re the construction of the pocket but you just have to trust and follow them and it all works out well.  The colours work really well together and I love the contrast.
Any changes I'd make next time: I plan to make this again but I might shorten it a bit as it is quite long and hangs out under most jackets except my trench coat or winter coat.  The sleeves are also a bit long, and they're very narrow so if I made this out of a jersey with less stretch I might widen the pattern pieces a bit.  
Total cost: £33 but then I still have enough jersey left for 2 t-shirts so it worked out a very good price I'd say.


Pooling in the lower back is visible here


Details - 
Pattern: On to my first make of 2017 - and it's an oldie at the same time, another dress version of one of my favourite patterns, the Plantain tee by Deer & Doe. This is a free pattern and it's brilliant!
Size: The dress pattern is the plantain tee in a size 38 at the bust grading out to a 40 at the waist and 42 at the hips but then I laid an old H&M t-shirt dress underneath and just traced that to make it into a dress pattern.
Fabric & notions: The lovely bright pink is a sweatshirt thickness fabric I got for £3 when Rosie from DIY Couture did a de-stash on Instagram  - what a bargain! It's such a gorgeous colour and pattern I couldn't resist it! It's quite a loose weave so it was too see-through on it's own to be a dress so it is lined with a cheap grey jersey from the Textile Centre in Walthamstow which probably cost me £3/4 for 1 metre.  I had pink thread - I always have pink thread as I sew a lot with pink.  I've just realised I totally forgot to use the wooly nylon thread in the bobbin when I did the hems. Here's hoping they don't snap or unravel at all.
Were the instructions clear?:  I really like the instructions for the plantain tee. They were the first instructions I followed for inserting sleeves flat and I do it like this most of the time now. It's such a fast sew.

Any changes I'd make next time: I used the same pattern pieces as for my previous dress versions but I had to take it in quite a lot at the side seams and shape it at the bottom. This might have been partly due to the fabrics I used as I basted the pink and grey pattern pieces together before sewing it up as one layer.  I think the pink fabric might have stretched out a bit and that the extra thickness of the two layers made it need the extra shaping at the waist, hips and hem.  I'm very pleased with how this turned out, it's so warm and I know I'll get lots of wear from it.  There is a bit of fabric pooling on the lower back though that I'd like to sort out before I make a dress version again. Does anyone have any tips for this? I wondered if I just need to make the back pattern piece narrower towards the lower back?
I didn't stitch down the neckline with the twin-needle as, although it doesn't look like it in this photo the neckline does lie pretty flat and I'm reluctant to use the twin needle on it as sometimes it makes it look worse. Does anyone have any other finished they use on knit neckbands?
Total cost: £6

So that's it, two pretty concise reviews about two basic makes that get/will get worn a lot.  Making this dress was such a nice way to start my sewing in 2017! Next up is sewing a quilt for a newborn baby, a batman cape & Bing soft toy for my son, and 2 t-shirts for my son I've had cut out for ages.