Friday 22 July 2016

Sewing roundup, come on, it's time to play


Having completely missed posting for the last Kids Clothes Week (though I did manage to get my projects uploaded on to the members site) I thought I'd do a quick round-up post of my children's sewing recently, before the next Kids Clothes Week comes round in early August. He wears me-mades quite a lot now and I love seeing him in things I've made. I just hope he keeps enjoying wearing them!


Owl Totem Raglan from Ottobre magazine, Spring 1/2014


You've already seen the Raglan sweater, which I plan to make more of for the Autumn. I've also made 2 versions of the Made by Rae Flashback Skinny tee so I'll do a wee write up on that pattern. Of course there's been another pair of Sunny Day shorts - I think there will be at least one pair of these every summer - and I'll do a quick review of this pattern too.


Short-sleeved Flashback Skinny Tee


Details -
Pattern: Flashback Skinny Tee
Size: 2T
Fabric & notions: Short-sleeved version was a mens M-sized t-shirt from charity shop, long sleeved version was scraps from previous makes - the blue, which I've used for Harris already here and here and the bird fabric which was originally used in this Maria Denmark tee, with scraps used here as well. Considering I only bought a metre of that bird fabric I've got a lot made from it! Red ribbing bought from Kitschy Coo, £5 for 1/3 of a metre
Were the instructions clear: Yes, very clear. So clear in fact that I'm considering buying the Geranium dress pattern as a pattern to use for little girl presents.
Any changes I'd make next time: I'm going to add some length to it, or maybe even move up to using the size 3T

Total cost: £5


Sunny Day shorts in Charley Harper Maritime birds fabric
Details -
Pattern: Sunny Day shorts by Oliver + S
Size: 2 years
Fabric & notions: 1/2 metre Charley Harper Maritime fabric from M is for Make £9.20, elastic and thread from stash
Were the instructions clear: yes, I've made this plenty of times before and didn't make any changes. I LOVE this pattern!
Any changes I'd make next time: I definitely need to go up to the size 3T

Total cost: £9.20


 Now it's time to start thinking about what I'm going to sew during the next Kids Clothes Week from August 8-14. If you haven't come across Kids Clothes Week before it's a week long challenge to sew for an hour a day for your kids or friends/families children. There is a theme each time but I don't usually use the theme, I just enjoy putting aside that time each day to sew for Harris, and other children in my life. It's a great wee community to be a part of, check out more about it here

Friday 8 July 2016

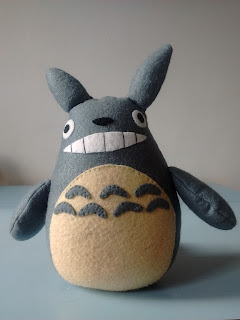
And you'll be with To-to-ro, Totoro! To-to-ro, Totoro!


If I had to pick a favourite animation film My Neighbour Totoro would win hands down, every time. I just love it and I'm happy to say I've now passed that love on to my son and my husband. It's a film that we all sit down and watch together and I hope it goes on being a family favourite - the current hit of the moment is Madagascar which is pretty good fun to watch too! 


Harris's love for Totoro was what inspired me to look up tutorials to make him a Totoro as I've been keen to have a go at soft toy making for a while now.  I could not believe my luck when I found this tutorial from Cheek and Stitch (update Sept 2018 - I’ve removed the link as unfortunately the blog has disappeared and the link looks dodgy now) - it was exactly what I was looking for! I printed out the pattern, got my felt from Hobby Craft and.. left it sitting for months as I'm prone to do.


Then I decided that I just had to make one for one of my friend's son's first birthday (as a fellow Totoro/Ghibli fan I knew she would appreciate it). Of course I couldn't make one for someone else and not for Harris so I decided just to go for it and make two at once.


The tutorial includes a free pattern which I printed out and backed onto card. The instructions are very clear and it all came together smoothly except for one thing. I found the 1/4" seam allowance made the ears, arms and tail just too fiddly to turn them right way out after stitching. I reduced the seam allowance to 1/8" and found this much easier.  The eyes, nose, mouth and belly are all done with hand-stitching and I really enjoyed doing this. I find it so relaxing to sew by hand.  I bought my stuffing from Hobby Craft too and was glad I'd bought 2 bags as it took lots of stuffing to make them nice and plump.


I am so happy with how these turned out, I got so much enjoyment out of making them and am sure that the love I put into making them has helped them turn out so happy looking! It's also been very gratifying to see that they are both well loved already, as you can see below!


Little hand in the corner coming to get his Totoro back!


Thursday 7 July 2016

Think Pink! Brumby Skirt

I'm back with more pink, and not just more pink but more pink skirts. This takes me up to a total of 3 pink skirts, with plans for another 2 already! This is definitely my new favourite skirt and I have a feeling it will quickly become one of my most worn items of clothing.  In fact I'm wearing it today and I feel so comfortable and confident in it. Isn't it amazing what clothes can do for you?!


The fabric is just such a gorgeous bright shade of pink, which sadly these photos don't truly reflect. I'd say the best representation of the colour is in the photograph above. I bought the fabric from Ray Stitch 3 or 4 years ago and I think it was described as a pink twill, although it doesn't seem as heavy as the pink Liberty twill of my Wildwood Flower skirt.  It's possible this is the fabric here, it certainly looks like a similar colour.
The pattern is the Brumby skirt by Megan Nielsen, gifted to me by Veronica Darling as part of a giveaway she did to celebrate her birthday and her 1000th blog post. I couldn't believe it when I won as it was the most amazing prize! Amelia (the talented lady behind Veronica Darling) sent me a box of goodies - fabric, trims and other goodies, as well as a Megan Nielsen pattern of my choice for me, and to be sent to her.  I chose the Brumby skirt as it had been on my wish list for a while.  You should also go check out the lush green velvet version Amelia made - I think I might need a velvet version for the winter! The pockets, ah the pockets! That was the first thing that attracted me to this pattern and they don't disappoint, they're roomy and such a good shape.  Then there were so many nice versions popping up, some of the ones that inspired me to try this pattern were Morepleasethankyou's in denim, Very Kerry Berry's in denim, Noble & Daughter's metallic voile version and Jasika Nicole's ladybird version.


Worn here with my favourite Grainline tiny pocket tank


This make took me ages overall as when I sewed it up first time round I attached the waistband upside down. This wouldn't have mattered if it was a straight waistband but the shape is very curved so it really hugs your waist, except mine didn't, mine went out. I wore it once as I loved the skirt so but it just looked ridiculous with the waist flaring out.  So I had to unpick it all, trying not to unpick all my neat hand-stitching and my pretty good lapped zip. Then it sat in my sewing pile, for months, and months, until, 2 days before my holiday, I decided it had to come with me. I'd originally cut the size S waist but as it sits quite high I found this too tight so I retraced the waistband pieces in the size M then reattached it, upside down again! Argh, at this point I only had one night left to sew before our holiday. I unpicked and re-sewed, the right way round this time. Amazingly, with a bit of fudging I managed to just hand-sew the rest of the zip back up and although it's not nearly so neat at the back now I don't care as, as I said before, I love it so! I ended up doing the last of the hand-sewing round the zip while on my holiday, sitting on the balcony. I think I need to find more hand-sewing projects for holidays as I really enjoyed it.


So, it's finally finished and I love it. Another Brumby skirt is now top of my summer sewing list, after the Inari tee dress and the bright pink shorts I've got cut out.

Details -
Pattern: a gift from Veronica Darling, as part of a wonderful parcel she sent me to celebrate her birthday (aren't sewing bloggers the best?!!)
Size: I used size M for the waistband and size S for the skirt pieces. I sewed up Version 1.
Alterations: Added length (sorry I can't remember how much as this was cut out before I started keeping a notebook for all my makes). Used a lapped zip rather than an exposed.  Sewed the waistband in a different size to the skirt pieces.
Fabric & notions: Pink twill from Ray Stitch, approx. £12 a metre, used 2 metres. Pink thread & pink overlocking thread, approx. £4. Interfacing from stash.
Were the instructions clear: Yes, I found it easy to follow the steps. The waistband issue was lack of concentration on my part as it's really quite obvious which side should be top and which the bottom.
Any changes I'd make next time: I'm going to try sewing a slightly bigger seam allowance on the waistband as it is a bit looser than it's meant to be, but the next size down was too tight, even with a smaller seam allowance. I'd like to try an exposed zip as I've never done one before.

Total cost: Approx £28


a close-up of the pocket


Pretty neat top-stitching


Not so neat lapped zipper.